Hello!
The following information is about fuel level sensor` issue of 2009 Hyundai Santa Fe GLS 2.7L. I am not an expert or a well-trained mechanic but I want to replace it by myself. I would like to share my experience cuz it would be helpful for DIY peoples like me.
If you have a questions, don't hesitate! Email Me! studymachine015@gmail.com
D-25
I visited to a garage to put a scanner on my car because check engine sign has been turned on.
According to the technician from the garage, my car has a problem in fuel sender.

D-25 ~ D-14
I searched information such as part numbers, the location of it, .... and I decided to fix it by myself.
1) I downloaded a maintenance manual for 2007 Hyundai Santa Fe 3.3L from slideshare.net and I found the locations of fuel senders. They are located under the rear seats.


D-12
The parts had been ordered.

D-6
My beautiful new parts have been arrived. Viva La Vie!


D-3
Even though petrol santa fe is not selling in South Korea as you know Hyundai is Korean company, they are offering useful maintenance guide for DIY peoples.

D+9 Days
Finally, I replaced two fuel level sensors in my Santa fe and it is working perfectly. NO PROBLEM ANYMORE!!!
Following video is my final work record.
If you are considering to replace the sensors by yourself(DIY) and have some questions, please read this post carefully and watch the following video. If you still have a question, don't hesitate it.
Email me: studymachine015@gmail.com
The following information is about fuel level sensor` issue of 2009 Hyundai Santa Fe GLS 2.7L. I am not an expert or a well-trained mechanic but I want to replace it by myself. I would like to share my experience cuz it would be helpful for DIY peoples like me.
If you have a questions, don't hesitate! Email Me! studymachine015@gmail.com
D-25
I visited to a garage to put a scanner on my car because check engine sign has been turned on.
According to the technician from the garage, my car has a problem in fuel sender.

D-25 ~ D-14
I searched information such as part numbers, the location of it, .... and I decided to fix it by myself.
1) I downloaded a maintenance manual for 2007 Hyundai Santa Fe 3.3L from slideshare.net and I found the locations of fuel senders. They are located under the rear seats.

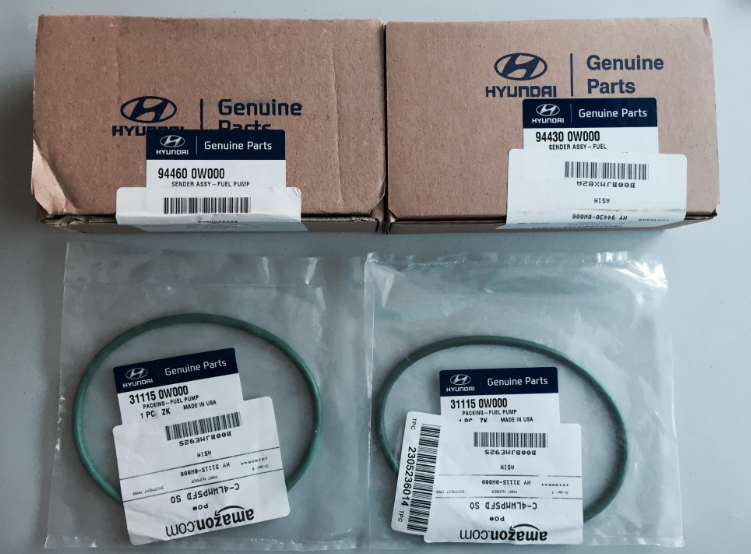
2) How to know the part number?
The following part numbers had been checked from hyundaipartsdeal.com. I checked many websites offering Hyundai parts but they used different part numbers, which I guess they made.

Left side fuel level sensor assembly - 94430
Right side fuel level sensor assembly - 94460
and I searched the parts in canadapartsonline.com but they says they don't have the parts.
So.. I checked ebay and amazon. Finally, I decided to order from Amazon.
D-12
The parts had been ordered.

D-6
My beautiful new parts have been arrived. Viva La Vie!

Before starting my DIY fixation, I will make a plan and post which tools are needed.
D-3
Even though petrol santa fe is not selling in South Korea as you know Hyundai is Korean company, they are offering useful maintenance guide for DIY peoples.
According to the manual,
Step 1. Remove the rear seats.
Step 2. Take off the the piece of cover (A).
 Step 3. Remove the fuel sender service cover (A)

 Step. 5 Finally you can access to the fuel sender.
Those are all information I collected from internet.
What need?

D-day.

As I planned, I performed from step 1 ~ 4... but..... but I couldn't remove the lock ring(right picture) of fuel sender assembly. So... I visited to some mechanic shops and I realized I need a special tool, named for
Step 1. Remove the rear seats.
Step 2. Take off the the piece of cover (A).
Step 4. Disconnect order is A, B, C, D, and E.
Those are all information I collected from internet.
What need?

For removing the rear seats, I may need more basic tools.
After fuel sender replacement, I will post my working video. Thanks.
D-day.

As I planned, I performed from step 1 ~ 4... but..... but I couldn't remove the lock ring(right picture) of fuel sender assembly. So... I visited to some mechanic shops and I realized I need a special tool, named for
OTC 6599 Universal Fuel Sender Lock Tool.
So... I ordered the fuel sender lock tool(left image) via amazon.
I think the new tool will be arrived within 5 days. In next time, my video will be started from the start to the end including how to remove the lock ring of the fuel sender assembly. Thanks.
D+9 Days
Finally, I replaced two fuel level sensors in my Santa fe and it is working perfectly. NO PROBLEM ANYMORE!!!
Following video is my final work record.
If you are considering to replace the sensors by yourself(DIY) and have some questions, please read this post carefully and watch the following video. If you still have a question, don't hesitate it.
Email me: studymachine015@gmail.com
Thanks.
!!!!!!!!!!-------Caution-------!!!!!!!!!!!!
When you try to remove the lock ring, they will be very tightly locked so it will be really hard to remove it without breaking your valuable tools. So... you can try my way.

The lock ring is held by 5~6 ring holders like the yellow circles. The ring will be unscrewed by counter-clockwise direction so you can easily remove it if you the ring holders up like following drawing.
 With a flat-screwdriver and a small hammer, I had hit the red point in every ring holding points and I removed the ring with the universal lock tools easily. Of course, you should hit it back in re-assembling steps.
I wish this info help your work and Thank Tommy O for your comment about it.
If you have a question or want to add any comment, please let me know. :) Thanks Guis~~~ :)
!!!!!!!!!!-------Caution-------!!!!!!!!!!!!
When you try to remove the lock ring, they will be very tightly locked so it will be really hard to remove it without breaking your valuable tools. So... you can try my way.

The lock ring is held by 5~6 ring holders like the yellow circles. The ring will be unscrewed by counter-clockwise direction so you can easily remove it if you the ring holders up like following drawing.

I wish this info help your work and Thank Tommy O for your comment about it.
If you have a question or want to add any comment, please let me know. :) Thanks Guis~~~ :)
Thank you! Very helpful - very well done!
ReplyDeleteI really hope this info help you. :) Thanks a lot for replying!!!
DeleteWell, I did it! Your video and blog were the only guide I used and it was spot on! The only thing I would add is that for me, the lock rings were VERY difficult to remove. I broke 3 ratchets - 2 taking the rings off and 1 putting one of the rings back on and I needed a 30" breaker bar to get enough leverage. Otherwise, tomorrow when the gasoline evaporates I'll vacuum the carpets and put everything back together.
ReplyDeleteThanks again!!
Congratulations!! Sounds great!! As you said, the lock rings would be very difficult to remove. In my case, a flat-head screwdriver and a small hammer were used to remove it easily. I will update it on the posting soon. Thanks! I just wanted other people to save their money like me. I wish it will run perfectly. GOOD JOB~ :)
DeleteThis comment has been removed by the author.
ReplyDeleteWow, what a complete guide to replace the fuel level sensor (even I have not been able to view the video yet -at work, YouTube video is blocked!
ReplyDeleteI also read similar info in Hyundai-forum, found that yours is better and like a text book, complete with tools requirements.
I thought I could give it to the dealer, but when they quote like CDN $1000 (taxes in), I figure I can do it for $400 in one Saturday :)
I may have further questions later, but so far it's great job you did!
Thank you so much! I hope you are going to replace them successfully. Thanks again.
ReplyDeleteAwesome replacement guide! I also plan to order my parts from Amazon because they seem to give better price/availability than my local dealership. I'll let you know how my installation goes. Thanks for making a great DIY guide.
ReplyDeleteThanks a lot! I hope you fix it easily. Good luck and please comment your experience. :)
DeleteReplaced both sensors and it went pretty smoothly (7 hours...). I used my action cam to record my process but the dang thing recorded over itself because I also did a radiator flush and changed my tires :( I have some pics but they don't do justice of the amount of work it took to change. Those lock rings were tough and highly recommend the tool and maybe soak them with rust spray to loosen them a bit. And it may be hard to explain but, the wires outside the covers are anchored which makes it hard to move the covers enough to access the connections. What I did was remove the electric tape from the achors which loosened them enough to move the covers to access the connections inside. Once you are finished, just retape the wires to the anchors using new electrical tape. Thanks again for your blog, it helped a lot!!
DeleteI really appreciated your detail comment. It would be really great if my post and video could help your work. Thanks again.
DeleteMany thanks for your blog and video!!! It was really helpful. As mentioned by many, the lock ring was very difficult to remove (and put back in!). I used a breaker bar and a ratchet and that worked.
ReplyDeleteNow the issue I am seeing - I reset the CEL by detaching the battery negative terminal for 15 minutes; but even though the fuel tank is full, the fuel gauge on the dashboard shows half-full. Any suggestions for what may be happening here?
Thanks.